Here's a quick guide on how to set up a brand new tenancy on myRent:
Step 1: Follow this link to start creating your tenancy
Enter your address and press "Next".
Can't find your address? We use the NZ Post database to look up your property location accurately. If it's a new property, the place may not be on their database yet. Not to worry, please follow this link for instructions.
If you've used myRent before, you can select the property from the existing list underneath the address search box.
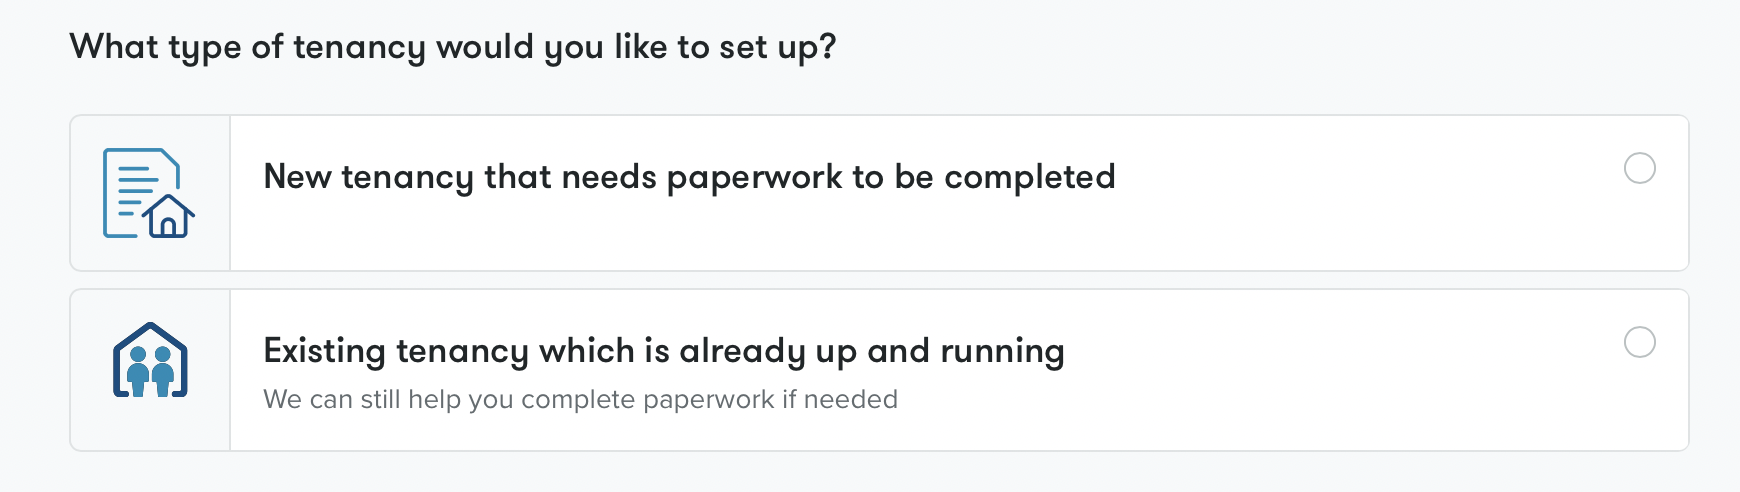
Step 2: Select which tenancy you're trying to set up
Since this is a new tenancy with new tenants, select the first option
Enter rent amount, rent frequency (paid weekly or fortnightly) and bond amount
Enter tenancy dates (if it's a fixed-term tenancy, please enter start and end date; if it's a periodic tenancy, just leave the end date field empty).
Once you're done, click "Next".
Don't worry if you make a mistake and need to change any of these details. You can still make changes later once the tenancy is set up. This option will be available under Settings.
You've now set up a basic tenancy on myRent. You will see a Guide on the tenancy Overview page to tell you the steps you need to make to finish onboarding.
Step 3: Confirm ownership and co-landlords.
On this page, you can nominate if the property is owned and managed by you, multiple landlords, a trust or a company.
If another person needs to access this tenancy, whose name is featured on the tenancy documents and future notices and who would need to sign the paperwork, you can add them on this page. The person will receive an email from us inviting them to create an account on myRent (if they don't have one) and join this tenancy.
Press "Save" once you're done.
Step 4: Add tenants
Enter the details of your tenants. If you don't have the details for each of your tenants, just enter what you have.
To allow tenants to sign tenancy paperwork, receive future notices, renewals, rent reminders and give them access to rent statements, you need to invite them to join this tenancy. When invited, we'll send them an email and SMS message with instructions to join myRent.
You can choose to invite tenants to this tenancy, or you can add them now but invite them later.
Step 5: Set up your rent
There are 3 rent collection options. To learn more about this option, head here.
-
Smart DIY rent collection. An easy way to keep accurate records and track rent payments. Tenants pay rent directly into your bank account. You enter rent in myRent, and we document it on the rent statement that is available for you and your tenants.
-
Automated rent collection. Connect your bank account to myRent via bank feeds. Tenants pay rent directly into your account. Payments are automatically tracked, the rent statement is updated for you, and overdue alerts are sent to your email.
-
Hands-free rent collection. Spend more time doing what you want and less time worrying about rent. myRent collects rent for you, reconciled it, provides real-time updates and chases arrears. Tenants have various options to pay rent. Rent is transferred to your account within one business day.
Select "Collect rent myself" if the rent will be paid to your bank account, and you will enter payments yourself (Smart DIY rent collection), or you're planning to connect your bank account to myRent to automate rent payments tracking.
Select "Use Hands-free rent collection" if you want a hands-free experience, and rent will be paid to myRent account.
It's entirely up to you which option you'd like to take, and you can definitely change your mind and switch between them. This option will be available under Settings.
Step 6: Add your bank account
This is the account to which rent will be paid (either by tenants or by myRent if you've opted into Hands-free rent collection).
Enter bank account details and press "Save."
Step 7: Confirm your rent statement
We've created a rent statement showing expected rent payments based on your provided information. Double-check the amount, frequency of payments, and due dates. If you're happy with what's displayed, simply press "Confirm".
Each situation and tenancy is unique and, at times, requires some adjustments. Press "Adjust" if you need to make any changes to the start date, due dates, amounts, frequency of payments or rent collection method. Once you're happy, press "Confirm".
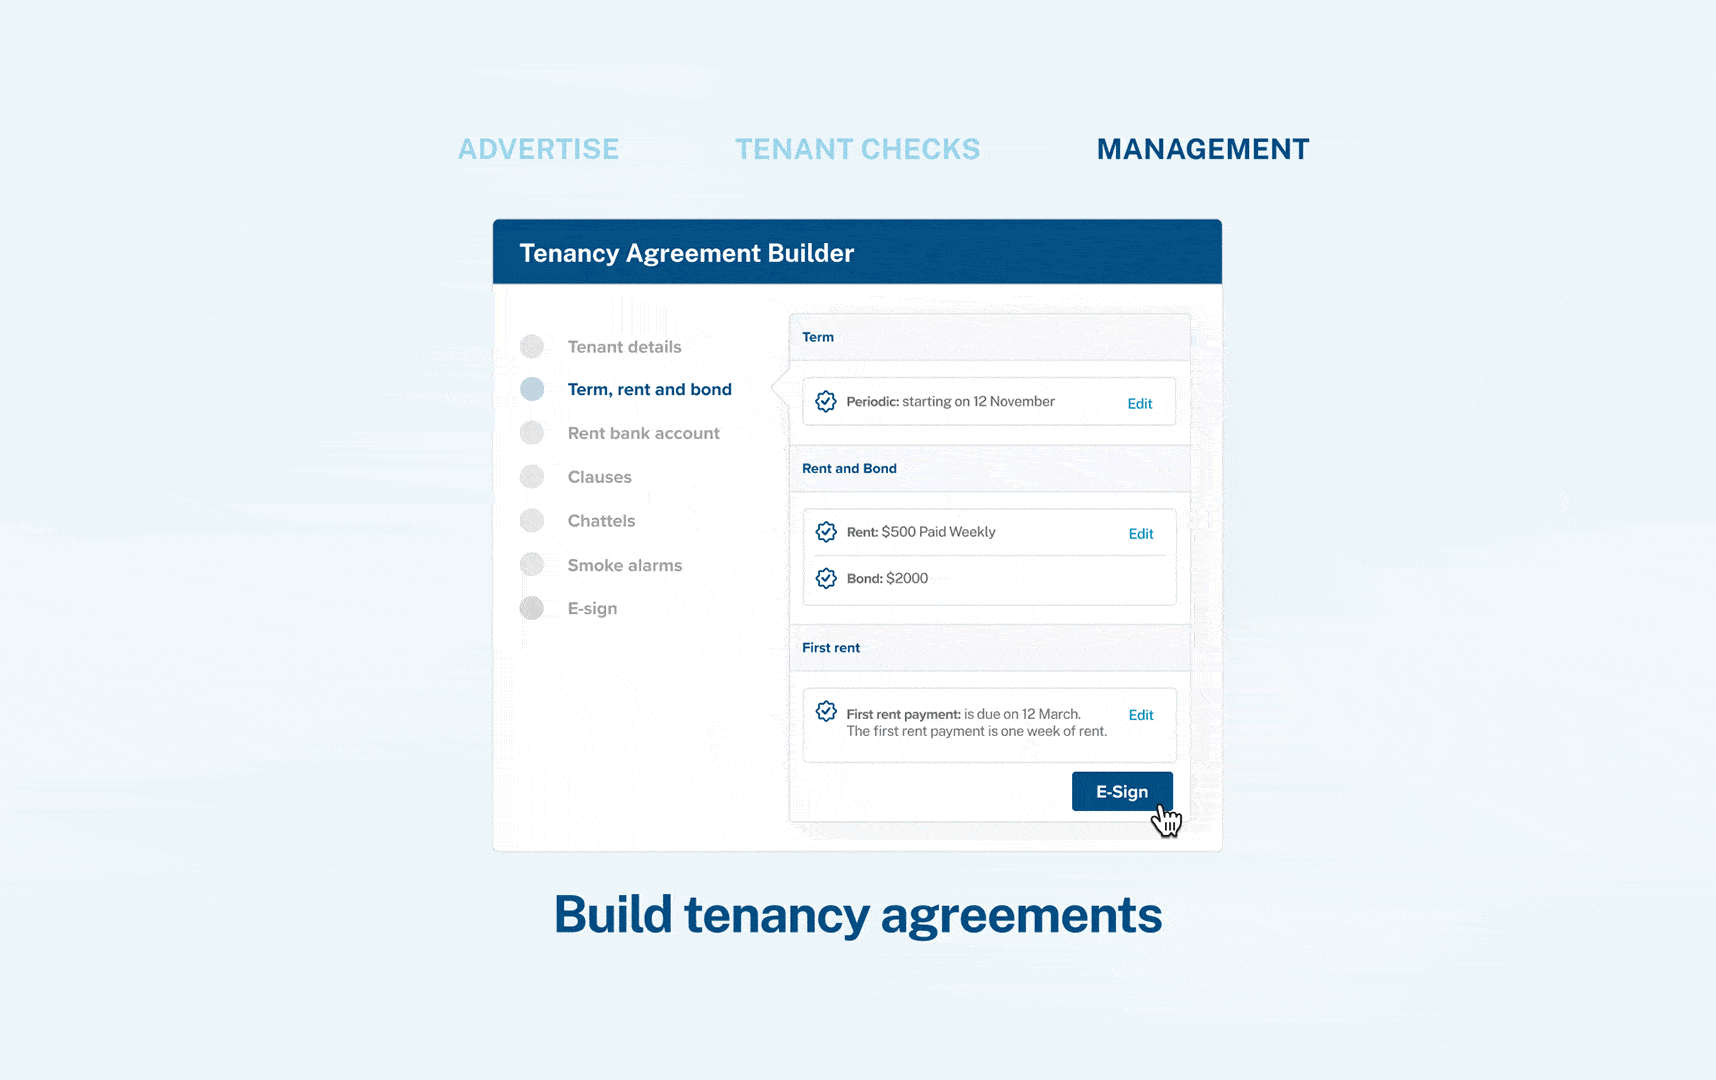
Step 8: Create tenancy paperwork
Now that tenancy is officially set up, the last important things remaining are:
- creating a tenancy agreement,
- collecting and lodging bond,
- scheduling and conducting an initial inspection
Here at myRent, we can assist you with all of these. We have a comprehensive tenancy agreement builder, automated bond collection and lodgement system and even digital inspection forms (with the inspection app becoming available very soon). As each step deserves its own guide, please look up more how-tos to guide you through if you need help with these.
If at any point you need assistance with the setup, please contact our customer service team. We're here to help and answer any questions you may have.